Labels

Showing posts with label projects. Show all posts

Saturday, December 14, 2013

A Christmas Party Favor!

The first weekend in December I hosted a dinner party for a few of my close friends and their spouses.  We had a fantastic appetizer dinner, a white elephant gift-exchange, loads of great conversation, and these cutesy little party favors I whipped up the day before:

Party favors aren't just for kids' birthdays anymore.  Everyone loves a little gift that says, "Thanks for attending; I'm glad you came."  For the men, I taped a Kit-Kat candy bar to a bottle of Coke, tied it up with some darling, Christmas ribbon and voila!  Mens' party favors were born.  They were a hit.  One of the guys said, "I'm going to consume both of them on the drive home."
The ladies' favors were equally as easy, although a bit more time consuming.  I found Christmas pictures on the internet, printed them out, and Mod-Podged them to small match boxes.  I taped the boxes to a red candle and again, tied it all up with festive Christmas ribbon.  Most of the ladies were pleased as punch, although one of my friends asked if she could have one of the guys' favors.  Of course!

Simple, quick and easy!  But mostly, they let my guests know I thought of them beforehand and wanted to show my appreciation for them.

Merry Christmas!

Saturday, November 16, 2013

Tagged!

This weekend I was looking through Pinterest (of course I was) and I found these!
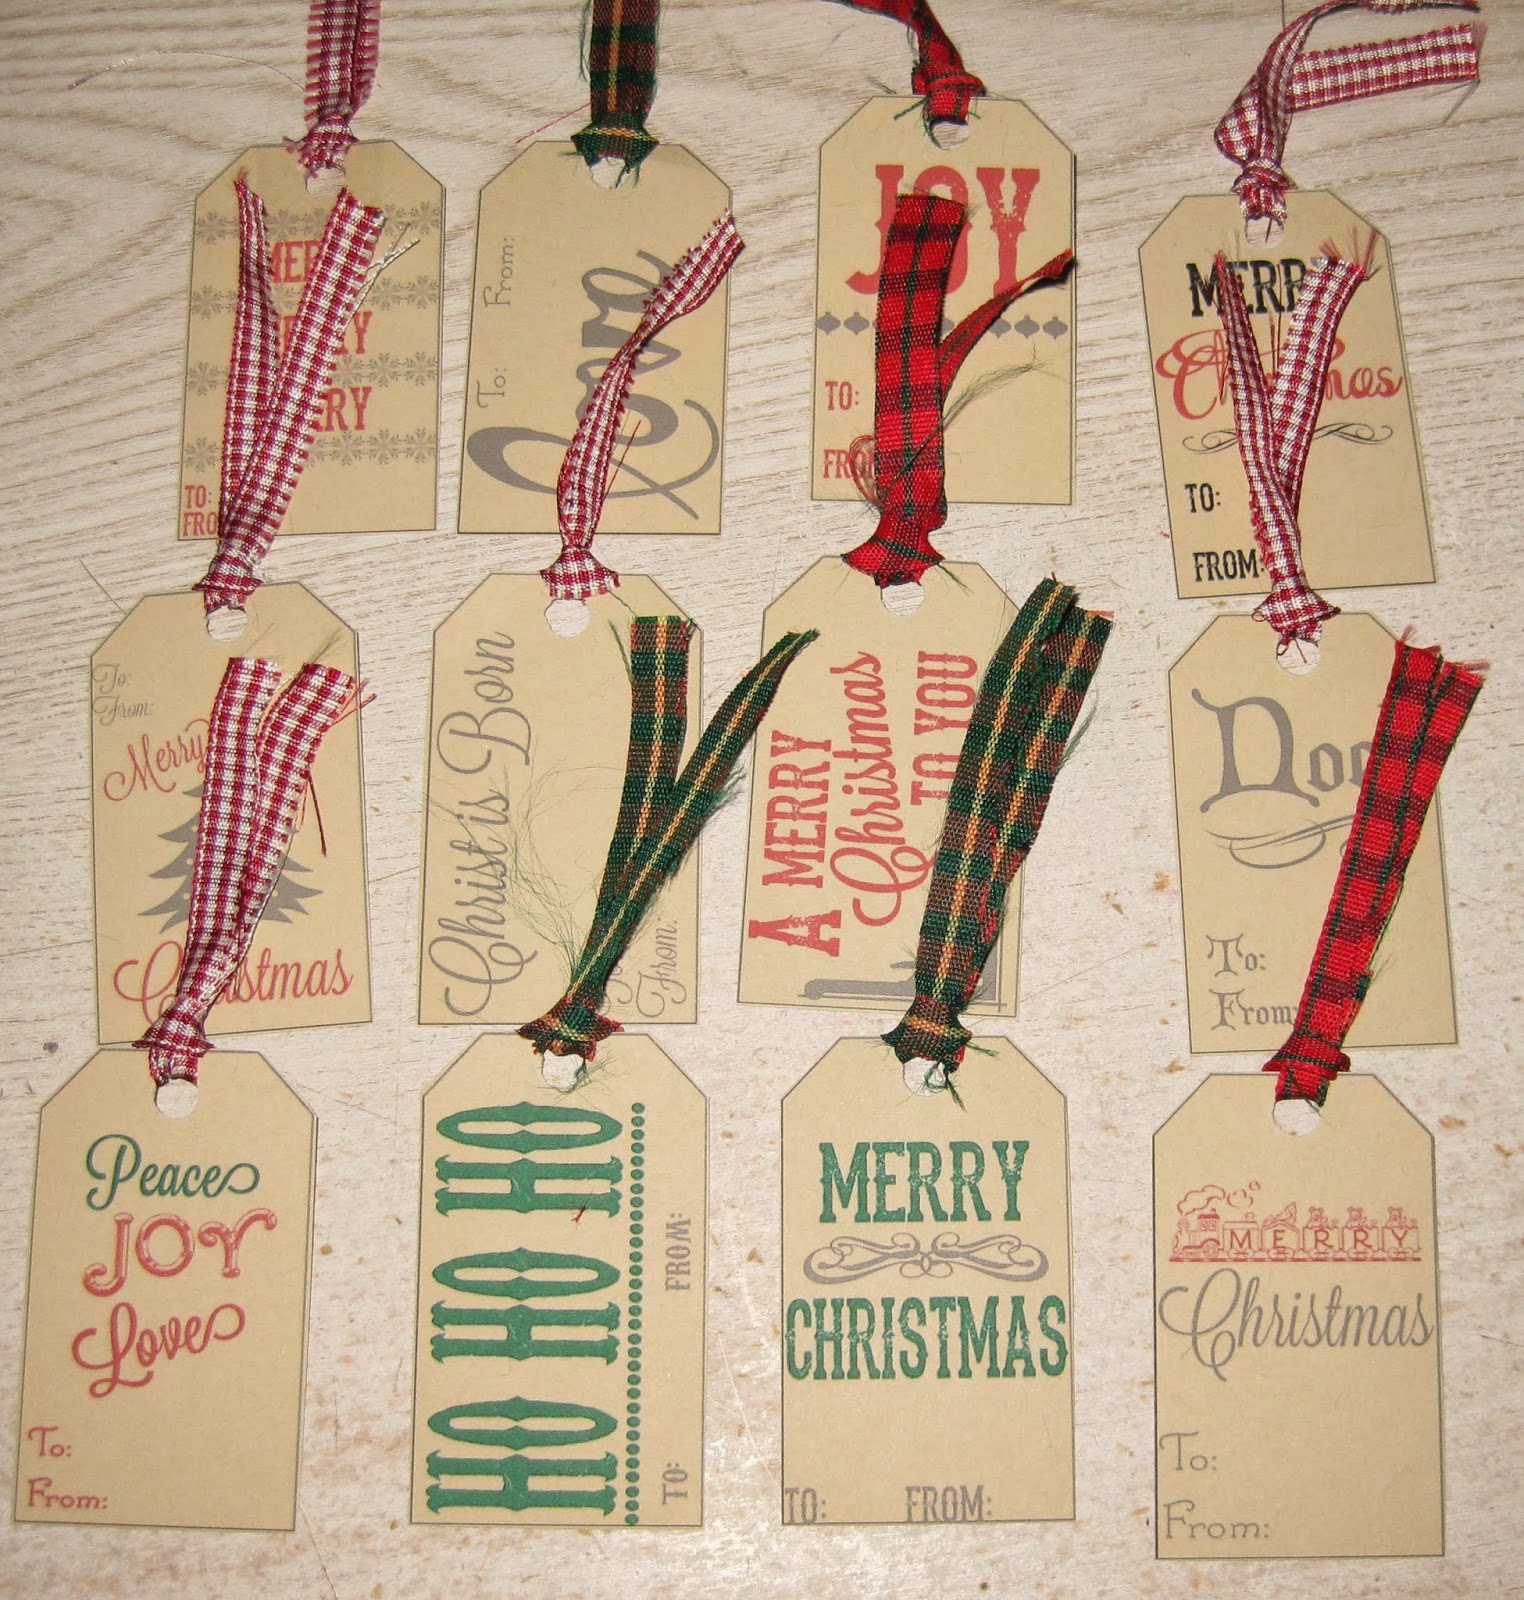
They're adorable Christmas gift tags that require NO downloading.  Simply open the document, load your printer with the card stock of your choice, and click print.  That's it, and it's totally FREE!!!  I LOOOOOOVE it when things are simple.  I've tried multiple times to print cute tags and other printables, only to realize I've installed a nasty virus, or 80.  Ugh!  These are truly as easy as I described.

So I printed a set.  I chose a light brown card stock, and a creamy one.  After printing and cutting them out, I knew my sister would see them and want a set for herself.  So I made her some too.  Behold:


Lisa and I have tags that are opposite.  Her "big" tags are on the darker card stock and her small ones are on the creamy card stock.  Mine are vice versa. 

The tags were printed to shape and in the colors shown above.  The only thing I added was the ribbon.  I selected a variety of Christmas patterns and cut them in thin strips so they would not only be small, but they would 'fray' a bit, enhancing their primitive look.  Oh, and the tags pictured here are mine. I removed the 'ho ho ho' tag from my sister's set since Lisa doesn't celebrate Santa :)

This a close up of a few of the tags.  I love the muted colors because it adds to the vintage appeal.

Cute tags couldn't just be handed over.  I decided they needed a bit of 'packaging' to corral them and make them even cuter.  Without wanting to go shopping for just the right bags, I cut Ziplocs down to size, folded the tops over and clipped them with a tiny clothespin (Yep, I happened to have those on hand).  I added the thin, red, checked ribbon and a heart-shaped music paper cut-out just for effect.

Obviously these could be wrapped up and bedecked a million different ways to make them cute.  Originally I sought jingle bells to tie around the top, but I couldn't find any small enough, so I gave up.

I can imagine a bowl full of these, displayed at a Christmas craft fair, wrapped in a variety of ways, and costing somewhere in the neighborhood of $5 to $6 a bag.  I wouldn't pay that, but I would admire them and think, "I'm going to go home and make some of those."

Yes, it was a lot more work than buying them, but it's a simple 'happy', made with love, going to a recipient who will enjoy owning them as much as I enjoyed making them!

Happy Christmas Gift Wrapping!! 


Monday, July 1, 2013

Window Frame Birthday Gift!

Right before my sister's birthday in June, we attended this incredible craft show at our local fair grounds.......and inspiration struck.  Below are some snapshots of her birthday present that Cory and I put together.

The old window frame that I've had for over a year now got a new look with some shiny, red spray paint.  Cory cut some thin wood pieces to fit on the ends, and I painted them with several coats of chalkboard paint.  The middle section we covered with chicken wire!

I whipped up a small bag with a jute drawstring to hold the chalk :)
The clothespins got a good coat of red paint, and using Mod Podge, I adhered the cherry scrapbook paper.  The clothespins are to attach little notes, cards, or papers to the chicken wire.

I think this will look amazing on the wall in her NEW office her husband is creating for her!

Happy Birthday Lisa!


Skip To My Lou

Thursday, December 27, 2012

You've Got Mail!

After seeing some cute mailboxes attached to children's doors on Pinterest (where else?) I decided I too wanted my girls to have mailboxes on their doors.  I didn't have a specific plan, but figured I would fill them from time to time with notes, little treats, or trinkets they've left lying around the house.  Imagine their surprise when they find a pair of dirty socks inside their mailbox?!

After giving it a bit of thought, I decided I REALLY wanted the mailboxes because they would be adorable to use for Advent.  In previous years I've tucked their Advent treats inside a small pocket-calendar that hung on my wall, but this year I wanted to go big.  As the girls age, a small piece of chocolate doesn't have the same significance it used to, so I knew I wanted to find them some fun, and possibly large, Advent treats.

I looked online everywhere I could imagine trying to find just the right mailboxes, to no avail.  The ones I found were either too big, too small, oddly shaped, or too ridiculously expensive!  Then, just before Thanksgiving I thought to ask my talented Father in Law if he would be willing to make the mailboxes.  He readily agreed and within just a few days I had these adorable boxes hanging on the girls' doors.

They loved them, and they loved lifting the lid each morning in December to see what special item had been left for them to find.  Some of the treats were small, like bottles of nail polish, candy bars, or earrings, and some treats were bigger.......boxes of Goldfish crackers, notepads with pens, and of course their Christmas Eve pajamas.

Thank you Poppy Jim for making the perfect mailboxes!  We love them!


Tuesday, August 28, 2012

Clip-It!

I finally got around to doing another craft and this one was E-A-S-Y!!!
Using medium sized binder clips I cut pieces of fabric to fit, and then mod-podged the fabric to the clip.  Done!

I think these would also be cute using ribbon or scrapbook paper, but with the paper I would definitely want to mod-podge the outside of the paper as well and not just secure it to the clip.


These are the tiny binder clips and they weren't quite as easy, but they're definitely as cute :)


Skip To My Lou


Wednesday, July 11, 2012

Patriotic Cabinet!

My father in law built this great cabinet for me a few weeks ago and it's taken me until now to get it painted.  I selected a navy blue Behr paint for the main part of the cabinet, and a white semi-gloss for the drawer.  I attached some star drawer-pulls that I bought over a year ago at Hobby Lobby.  The cabinet is located in my kitchen and I cannot wait to start filling it with kitchen gadgets and gizmos.  Thanks Jim!  I LOVE IT!!!


This is how I received the cabinet - bare wood!  The drawer is pulled out for painting!

After painting.....and distressing!  It will sit adjacent to a gorgeous red cabinet my sister gifted to me , and they will be the perfect patriotic complements!


Tuesday, March 27, 2012

Button Bookmarks!

These were a snap to make.  Cut a piece of felt to attach to the back, then hot glue a variety of buttons to the jumbo paper clips for a simple, cute book mark!
I made these as homework reminders, for the ladies in my Bible study group :)

p.s. Sorry about the big shadow across the picture.  It was 2am and I was too tired/lazy to re-take the picture !!!


Tuesday, February 28, 2012

"Frame Job"

When we moved into our house, we painted everything and I mean EVERYTHING!  So, by the time we were nearly finished, we were so sick of painting that we hired out some of the final work.  One of those jobs was the hallway.  Two ladies came in and painted some closets and the hallways, and clearly they didn't remove the thermostat before painting, they just painted around it.  A few months later, when we upgraded our furnace, we also upgraded our thermostat.  As you can see, the old one was round and the new one was a rectangle - thus the illustrious marks on the wall.

A few months ago, I saw a photo of someone's thermostat and it had a frame around it, and while I'm sure they did it merely for aesthetics, I wanted to do it to cover up the huge flaw on my wall.  I never could find a frame that suited my needs (or my budget - I wasn't spending big $$$ on a frame for my thermostat, no matter how much I needed it), so when I stumbled upon a cheap wooden frame at Michael's I was thrilled.  I had every intention of painting the frame, but ultimately decided I liked the natural wood appeal.  So, below is a picture of the thermostat sans frame.......


And above, is the thermostat with the frame.  Using cardboard, I created a mat and covered it with a neutral fabric and then hot-glued the mat to the frame.  Personally, I think it dresses up the thermostat, and hides the ugliness of the former one quite nicely!  And the best part?  (besides the fact that my wall is significantly improved) it cost all of $1.99.

I'm linked up here:

Tuesday, February 7, 2012

Paper Roses!

Last night I selected a free 'on demand' movie and set out to make some enduring Valentine's roses.  They're fairly simple to make, but I won't lie, they're a bit time consuming.  I started with red construction paper that I cut into a circle.  I then cut the paper in a swirl fashion so I'd end up with a long, curly, strip of paper.  After that, I wound the paper around a pen to form the rose shape.

Once the rose was formed, I removed it from the pen and then slightly released it so it would open up.  Then I flipped it over and hot glued it on the bottom so it would retain its shape.  The roses were cute enough, but they needed a little something more (I say that a lot).  Glitter!  Yep, I hate to work with it, but I LOVE the way it looks.  So I spread a little Mod Podge over the tips of each 'petal' and dipped the head in red glitter.  

This morning, once they were dry, I sprayed some clear sealer on the roses so the glitter wouldn't flake off all over the place.  And there you have it.  I only made 10 and I wish I'd made a couple dozen more, but they were so time consuming that's all I could turn out.  Maybe another day!


Thursday, February 2, 2012

Tiny Heart Banner!

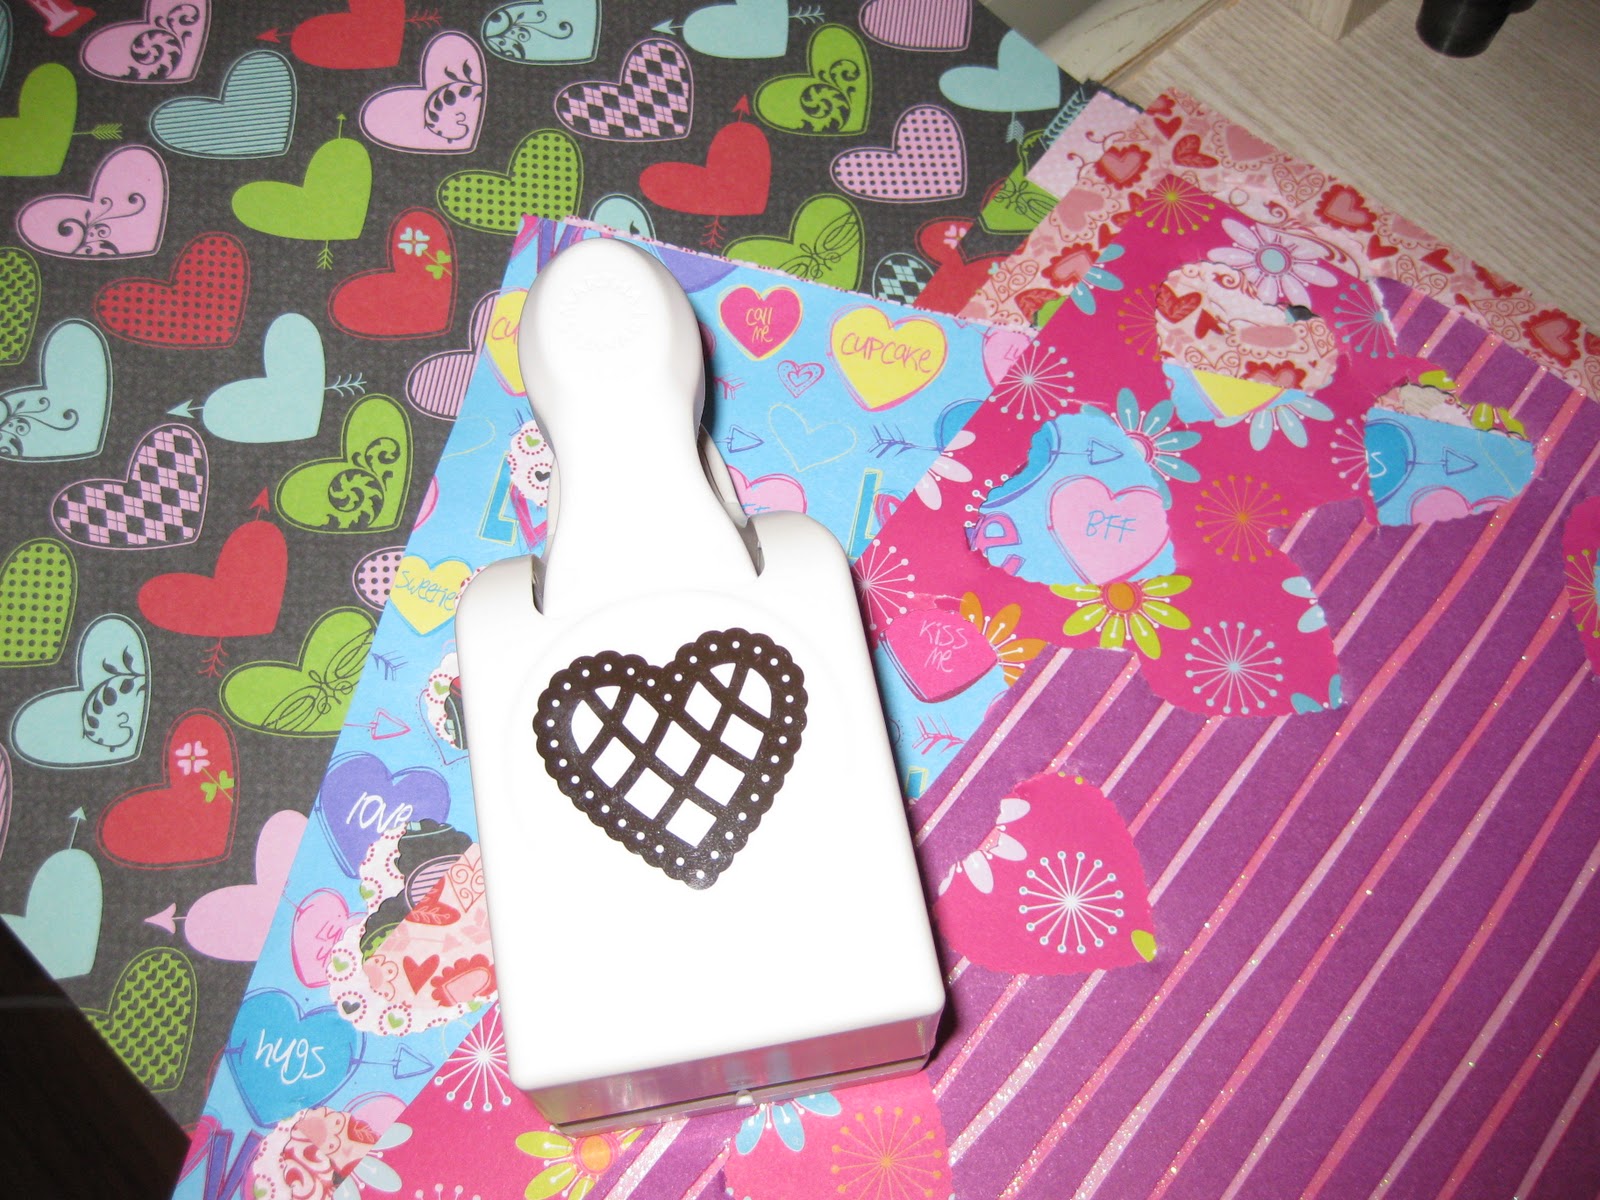
I saw a super cute heart banner on Pinterest.  It was made using a heart-shaped craft punch to cut hearts from paint samples, and then strung together with thread.  I pinned it, but didn't figure I'd make it since I didn't have a heart punch.  Then, upon opening my craft cabinet it was sitting right there......the Martha Stewart Heart Punch my sister had included in my Christmas gift.  It was a glorious moment indeed as I realized a plethora of Valentine's crafts had just been opened up to me.

I began by gathering my supplies; craft punch, mod-podge and a variety of V-Day appropriate scrapbook paper.

Since my scrapbook paper wasn't double sided, I cut  two hearts out of each paper pattern and mod-podged them together so the banner wouldn't 'have' to be hung against a wall - if it were hung in the middle of the room, the hearts would have a print on both sides :)

Not being very ingenious, I hung it against a wall :)

Here's a close-up of a few of the hearts.  I actually mod-podged the fronts and backs once they were stuck together, just to make them a little sturdier.  I love that the craft punch had a pattern in it instead of being a solid heart.  It made it easy to thread a sheer ribbon in between the holes of the hearts.  The ribbon was just tight enough that I could slide the hearts exactly where I wanted them and they stayed put.  I think my ribbon was 3/8" but don't quote me on it - I'm bad with measurements :)

The best part about this project was it was not only quick, but it was made with supplies I had on hand.

Happy "Heart" Day!

Friday, January 27, 2012

A Banner & A Bag!

In early January I put away 8 Rubbermaids filled with Christmas decor.  So you can imagine my sadness when I hauled up my one, lone Valentine's decor box.  In an effort to expand my decorations for V-Day, I created this simple heart banner.  Made of 12 felt hearts, top-stitched and adorned with hand-sewn buttons, it gave a bit of flair to the window across from my dining room.  Now I only need to make about 700 more items so my Valentine decorations boxes can rival my Christmas boxes!

Heart banner; felt with buttons!

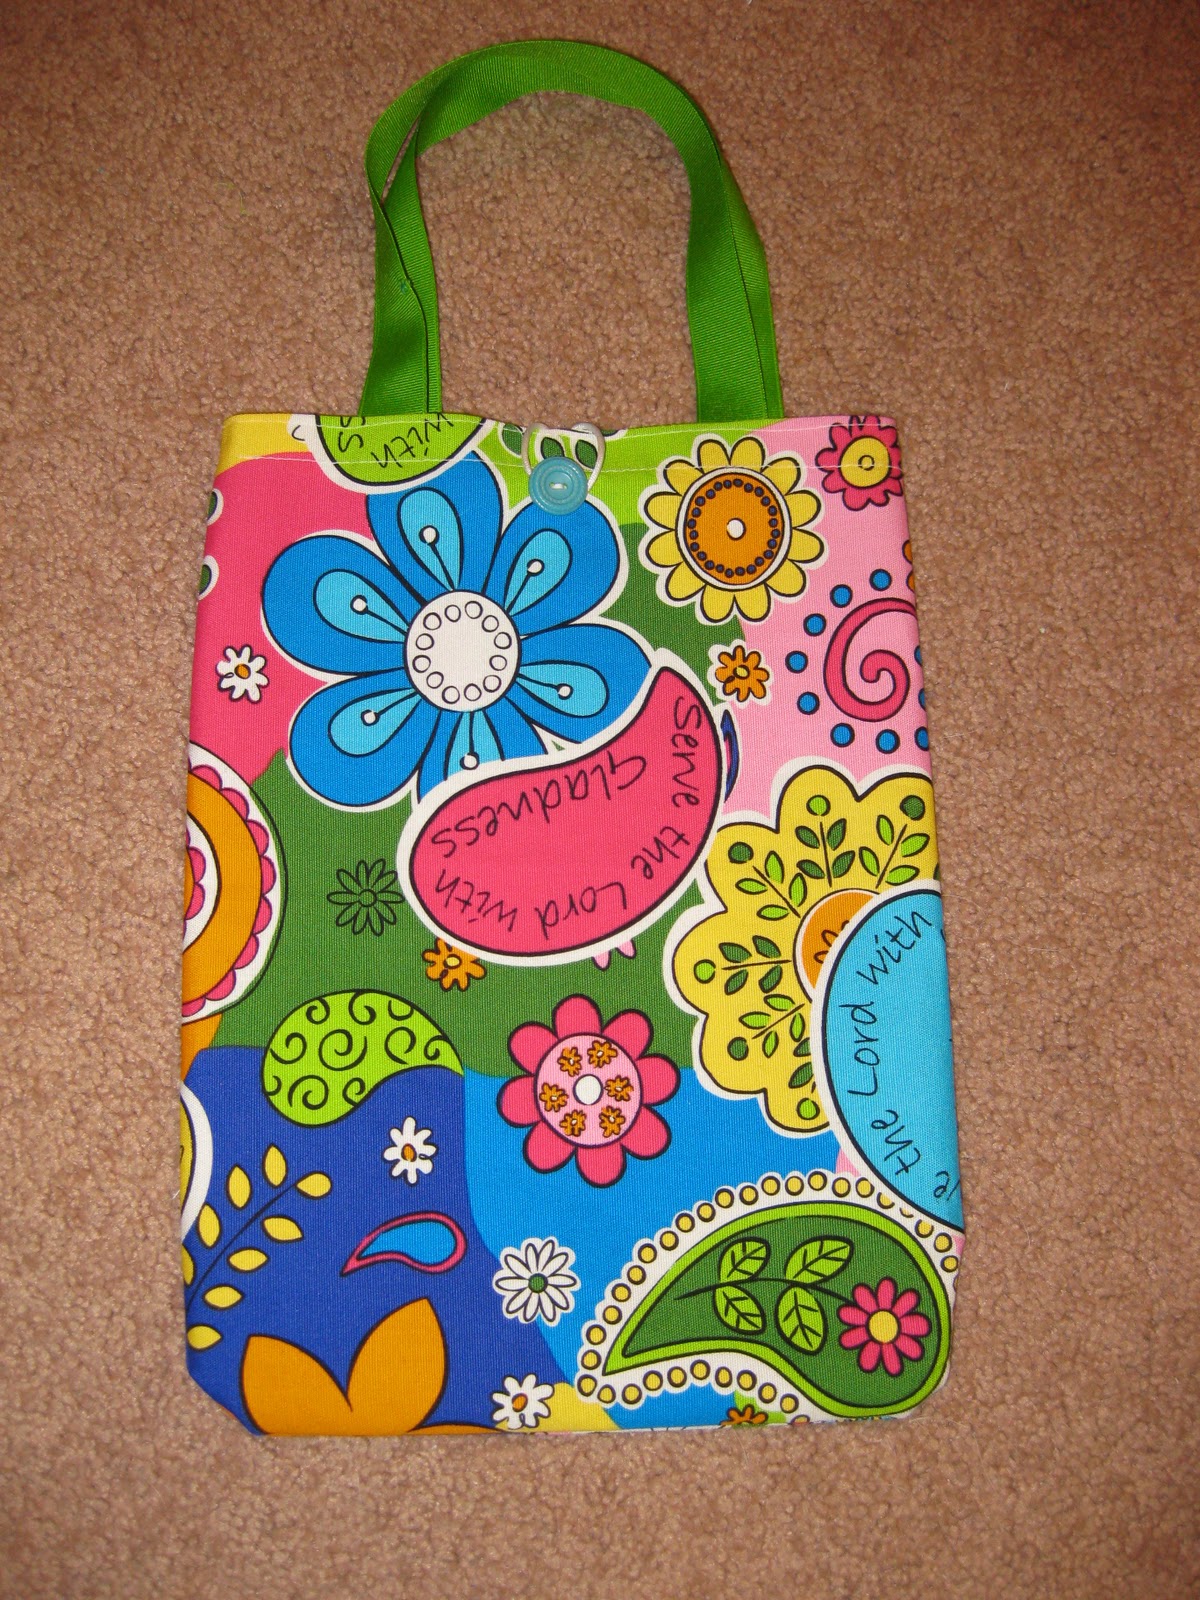
Last week at the LifeWay store I found this darling fabric placemat in the clearance section for a mere $.39 cents.  I couldn't resist.  I brought it home and Cayla instantly loved the bright colors; so tonight I created a simple church bag that she can't wait to carry with her next week!

Weekend Wrap-Up Party Here:

Monday, January 16, 2012

Owl Craze!

Inspired by a cute little stuffed animal my friend makes, I set out to design my own fluffy stuffie.  After looking online for a while, owls seemed like the most logical choice since they're easily identifiable just by the shape of their eyes and nose.
I created my own 'pattern' on paper and it took a bit to get the 'body' correct.  If it's too round, it looks more like a cat, so it needed just a bit of bulk.  After getting it where I wanted it, I sewed up the green owl in about 20 minutes.  The green one has jersey knit eye-whites which are reinforced with fusible pellon.  The other two are totally made of fleece so they went a little faster.  Cayla's is the pink one (named Hootie) and she chose white buttons for her eyes.  The purple one is just another demo I made to play with eye direction and shape as well as other features, like the hair bow and size of the nose.

At roughly 5" wide by 6" tall, they go pretty fast and require minimal materials, so I'm looking forward to shopping for some adorable buttons and maybe some crazy-patterned fleece (like plaid) to give them a ton of character.  OWL be sure to show you pictures as I create more of these little guys!

Thursday, January 12, 2012

Heart Attack!

Although I'm trying to enjoy winter by keeping snowmen, snowflakes and January related decorations up in my home, my mind (with the help of Pinterest) keeps wandering to all things Valentines.  And due to my recent thumb surgery, sewing was not an option last week.  But this weekend, I figured I had nothing to lose, so I broke out the felt, pink fabrics and pinking shears to begin sewing up dozens of hearts.

I have to admit, the pinking shears hit my thumb in such a way that it was painful to cut, so I asked Cory to cut out the hearts and he kindly obliged.  Below is a sampling of the "heart attack" that took place in my sewing room......


Made of felt and cut with pinking shears, these sweet little hearts are two layers thick and top stitched in contrasting white.  The girls wanted some for themselves, and some to give to their friends.  These literally took MINUTES to whip up, and I learned that sewing small hearts is much easier in felt than other fabrics.  Because felt is stiff, it's easier to turn the heart as you sew.

These are two layers of cotton fabric, cut with pinking shears, and top stitched all the way around and then stuffed with a little batting to make them fluffy.

Simple and cute, they will really add to my Valentine's decorations.

On Tuesday my sister came over bearing these adorable little 'lacy' hearts in pink, red, white and purple felt.  I provided the ribbon and we strung up a simple banner to adorn our fireplaces.


A close- up of one of the pink hearts.  Simple to string into a banner, we had these done in just a few minutes.

Both of these projects were inexpensive, simple and quick.  An easy task for kids to help with, or to make for friends and family.

Happy Valentine's Day!

Wednesday, December 28, 2011

Blog Button!

If you're reading this post and you shift your eyes to the left....you will see my new blog button.  After noticing numerous buttons on other blogs, I thought I could make one for my blog, proudly advertising my denomination.  It was a piece.of.cake to create too.  Here's what I did:

1)  Go to picnik.com
2)  Click on 'upload a photo'
3)  Use an existing photo, or surf the web for a background (like my snowflakes) you like and save it to your computer.
4)  Follow picnik's instructions to create your picture (button).  Start by re-sizing the photo (picnik automatically sizes one of the sides, so if you pick '250' as your height, it will automatically adjust the width to be proportionate).  250 or roughly there is a good button size.
5)  Add your text in the box on the top left of picnik.  On the top right, you can change the font, and size and direction of your wording by playing around with it - it's all right there on the screen for you.
6)  Click on 'save photo' and save your picture to your computer.
7)  Open your blog and add a gadget (choose 'add photo' as your gadget).
8)  Click on 'image' and select the photo you just created in picnik.

There you go!  It's a lot simpler than my instructions make it seem!  You now have a button!  What a great way to advertise something about yourself, something you love, or an Etsy shop (if you have one :)

Wednesday, December 21, 2011

Bows and Bands and Bags oh my!

After searching high and low for perfect inexpensive, yet cute, headbands to coordinate with the girls' Christmas outfits, I finally gave up and decided to make my own.
I did purchase the basic headband.  In fact, it came in a pack of 6 with only 1 white one in the pack, so I had to purchase TWO packs.  But I only paid $5.00 for all twelve bands.  One store wanted to charge me $9 for a so-so headband that was a bit shopworn.  Pfffft!

I followed the tutorial shown here and it was pretty easy.  In fact, making the bow was the simple part.  Attaching it to the headband?  Not so much.  I pondered a variety of ideas, such as velcro, but none of them seemed to be exactly what I wanted.  I even considered hot gluing the bow to the band, but I'm cheap frugal and I thought I might want to use the headbands again.  So after much thought, I wound some embroidery floss through the bow and simply tied it to the headband.  Since the bow itself is all stitched together, I can just snip through the embroidery floss to remove the bow, thereby preserving both the bow and the headband.  Genius!

After this I think I'll invest in some clips that I can permanently attach the bows to, and then I can trade them out to match various outfits.  Oh who am I kidding?  My kids hate hair accessories.  In fact, I'm not even sure how I talked them into wearing them on Christmas.  But I did.  And that's the point!
Finally, I made the girls matching tote bags to carry on Sunday.  I plan to pack them with  fun, girlie things like lip gloss, tissues, notepads, knick knacks and of course money, because what fun is a bag without money?!   So now, their outfits are complete and matching from head to toe.

Merry 'Matching' Christmas!

Saturday, December 17, 2011

Christmas Clothes!

This afternoon I made the girls Christmas outfits.  After buying matching red tops, they each picked out the fabric for the skirt, and the Christmas tree applique on the shirt.  These were SO easy to make.  It took me about 3 hours from start to finish.  They can't wait to wear them to their grandparents on Friday night, then again to church on Christmas morning.

Each tree is the same, and contains fabric from Autumn's skirt, but I needed all the fabric to make Cayla's skirt, so her skirt fabric didn't make it onto the tree :(  I thought they coordinated really well though.
Here's a close-up of the tree.  Using the various fabrics, I applied Heat 'n Bond before cutting out the tree pattern.  Once cut, I ironed it on and top-stitched around the edges.  I finished it with a white bow tree-topper.  Sweet and simple.....just the way we like it!

Merry Christmas!

Thursday, December 15, 2011

Getting Organized!

 Last fall my father in law offered me a large sized shutter after I expressed interest in one for a project.  I knew I wanted to paint it and use it to hold Christmas cards.  Behold:

I began by painting it red, but the red spray paint I bought was cheap.  It's worth the extra couple of dollars to buy Krylon or Rustoleum.  And while I definitely didn't set out to paint it gold, I happened to have some Krylon metallic gold on hand because I used it to paint the crowns for the Wise men to wear during the children's music at church :)  One quick, coat and my card holder was reborn.

I'm honestly thinking of painting the backside Krylon red and using it during the year as decor in my living room, then flipping it to the gold side during the holidays.  Can't lose :)

I almost put a solid piece of wood behind the slats so the cards don't fall through, but OBVIOUSLY that won't work if I plan to use both sides alternately during the year.  I grabbed a couple of decorated clothespins to hold up Christmas card photos, and just slipped standard cards onto the slats.  Voila!  Organized and attractive (at least I think so).
My next organizing project was this purse organizer that I've been thinking about for some time now.  I have a darling Vera Bradley make up bag that I keep in my purse to hold various objects.  But they always manage to turn over, slip to the bottom and get lost in the great abyss.

Ta da!!!  I made pockets for each item, slipped the belongings in, rolled it up and tucked it into my make up bag.  It's SO nice.  Now when I reach for my nail file, it's up right, where I can find it, not laying down at the bottom, stabbing me as I try to grab it.  I love little things that bring me incredible joy :)

Saturday, December 10, 2011

Baby It's Cold Outside!

Last week I stitched up a couple of these little gems: Homemade Heating Pads.  Microwave for up to 2 minutes to soothe away aches and pains, and keep toes toasty.  Or, throw them in the freezer and you have an instant cold compress for bumps and bruises.  Each flannel bag contains extra clean deer corn combined with cinnamon to make them smell wonderful.  The bags are then slipped into a matching 'pillow case' to keep them clean.  Oils from the skin and less than meticulous microwaves can get the bags really dingy, and since they can't be washed, the pillow case makes a great barrier, which can be machine washed and dried prior to the next use.

My girls love them, and Autumn uses hers nearly every night.  I love to put mine under my feet while I watch TV!  Unlike rice, corn heats more evenly and retains heat longer.  At least, in my opinion it does :)

A couple of tips if you make one of your own; 1) Use extra-clean deer corn, which can be purchased at Wal-Mart of all places.  Anything less will be really dusty and dirty to work with.  2) I like the scent of cinnamon, but any essential oil can be added to make the bags smell terrific.  3)  Do not heat for more than 2 minutes at a time.  Longer heating times can result in burns to the skin, and scorching of the corn inside.  Then it won't matter what you've scented it with, it will smell burnt.  4)  Use 100% cotton fabric.  Polyester blends can catch fire.  Obviously I don't need to elaborate on this tip :)

This one is mine.  It's made from ultra soft flannel and it's wonderful on those nights where the mercury drops to arctic temperatures :)

This one was intended for Cayla, but Autumn saw it and, well, the rest is history.  Cayla didn't stand a chance :)

I joined the link party at: